

How to Mic a Drum Kit: Kick, Snare & Toms Explained – Miktek T100, T200, PM10 & PM11
A great drum sound rarely starts with EQ, compression or plug-ins.
It starts with the drummer, the tuning of the kit, the room and where you put the microphones.
A microphone moved just a few centimetres can change the balance between attack, body, resonance and cymbal spill more dramatically than several minutes of EQ.
That is why drum miking is worth understanding rather than simply copying somebody else's microphone positions.
In this guide, we are going to look at practical ways to mic kick drum, snare and toms for both live sound and recording, using four microphones we know particularly well:
- Miktek T100 – snare, tom and instrument microphone.
- Miktek T200 – kick, low tom and bass-source microphone.
- Miktek PM10 – premium snare/tom microphone.
- Miktek PM11 – premium kick and low-frequency microphone.
We will also look at the Miktek PMD7, a complete seven-microphone premium drum system combining PM10, PM11 and a matched pair of C5 condenser microphones for overheads.
There is no single correct microphone position for a drum. Start with a sensible position, listen, move the microphone and let the sound tell you where it should be.
Why we have trusted Miktek for many years
Our relationship with Miktek goes back much further than ScaleNordic and much further than the drum microphones in this article.
When we ran Procom Music AS in Norway, Miktek became one of the microphone brands we worked particularly closely with.
We sold a lot of Miktek microphones.
The product that really stood out for us was the Miktek CV4 tube condenser.
We sold close to 300 CV4 microphones in Norway alone.
For an expensive professional tube microphone in a relatively small market like Norway, that was a remarkable number.
But there was a reason people responded to it.
The CV4 helped establish what we thought of as the Miktek sound
The CV4 had a very particular character.
It could sound detailed and open without becoming hard or aggressive in the upper frequencies.
Vocals could have clarity and air while still retaining a smooth, almost velvety quality.
That balance was one of the reasons the microphone became so successful for us.
We also had direct experience with some extremely expensive studio microphones, including the Sony C800G.
Having owned and worked with a C800G gave us a useful reference when evaluating microphones such as the CV4.
We would never claim that the CV4 and C800G are the same microphone or that they sound identical.
They do not.
But to our ears, the CV4 had some of the qualities that make microphones in that class so attractive on vocals: an open top end, plenty of detail and a presentation that remained smooth rather than becoming aggressive.
What impressed us was the same general idea of getting clarity, air and detail while keeping the vocal smooth and musical.
The CV4 also developed a strong reputation among professional artists and engineers, and Dolly Parton was among the artists publicly associated with the microphone during Miktek's earlier years.
That history matters because it explains why we took Miktek seriously long before T100, T200, PM10 and PM11 became part of our microphone catalogue.
Nashville is an important part of the Miktek story
Miktek is based in Nashville, Tennessee – one of the most important recording cities in the world.
For a microphone manufacturer, being surrounded by working musicians, recording engineers and studios creates a useful environment for developing and evaluating professional audio products.
Miktek developed its microphones around custom capsule designs, transformers and carefully selected components, with real studio and live applications forming an important part of the design philosophy.
That philosophy is particularly visible in the PM Series.
The PM10 and PM11 use custom neodymium capsules combined with US-made AMI transformers, and the microphones are assembled and tested in Nashville.
The T Series takes a different route.
T100 and T200 are produced in Asia to bring the cost down while retaining Miktek's approach to capsule design, transformer coupling and voicing.
In our experience, the T Series retains a great deal of the same Miktek family character we know from the PM Series, but at a considerably lower price.
They use different production strategies and sit at different price levels. But they clearly come from the same design philosophy, and that is one reason the T100 and T200 are so interesting.
Before choosing a microphone, get the drum right
No microphone can completely rescue a badly tuned drum.
If the snare has an unpleasant ring acoustically, putting an expensive microphone in front of it does not make the ring disappear.
If the kick drum has no useful low-frequency energy in the room, adding 60 Hz on an equaliser is not the same thing as capturing a good low-frequency tone in the first place.
Before placing microphones, check:
- Drum tuning.
- Condition of the heads.
- Damping, if required.
- Snare-wire tension.
- Kick-drum beater choice and position.
- Whether anything is physically rattling.
- How the complete kit sounds from the drummer's position.
The better the source sounds, the easier everything becomes later.
How many microphones do you actually need on a drum kit?
There is no rule saying every drum needs its own microphone.
A good drummer in a good room can sound fantastic with surprisingly few microphones.
For live work, however, close microphones give the engineer control over individual drums and make it easier to obtain enough level before feedback.
A typical setup might include:
- One microphone on kick.
- One microphone on snare.
- One microphone on each rack and floor tom.
- One or two overhead microphones.
A larger studio setup might add snare bottom, a second kick microphone, hi-hat and room microphones.
More microphones do not automatically mean a better drum sound.
Every additional microphone also creates another possible phase relationship that needs to be managed.
Why supercardioid microphones work so well around drums
All four close microphones discussed here use a supercardioid pickup pattern.
This is particularly useful on a drum kit because drums are surrounded by other very loud sound sources.
The microphone needs to capture the drum in front of it while reducing as much unwanted cymbal, hi-hat and neighbouring-drum spill as practical.
A supercardioid pattern is tighter than a conventional cardioid pattern.
That gives strong side rejection, which can be extremely useful when several microphones are positioned close together.
However, there is an important detail that is often misunderstood.
A supercardioid microphone has a small pickup lobe directly behind it.
That means the back of the microphone is not necessarily the point of maximum rejection.
Rotate the microphone while listening. The strongest rejection is slightly off the rear axis, and a small change in angle can significantly reduce hi-hat or cymbal spill.
Miking a snare drum
The snare is one of the most important sounds in most modern drum mixes.
It also sits in one of the most difficult places on the kit.
The microphone may be only a short distance from a very loud hi-hat, rack tom and cymbals.
This is exactly where a tight pickup pattern becomes useful.
A good starting position for snare
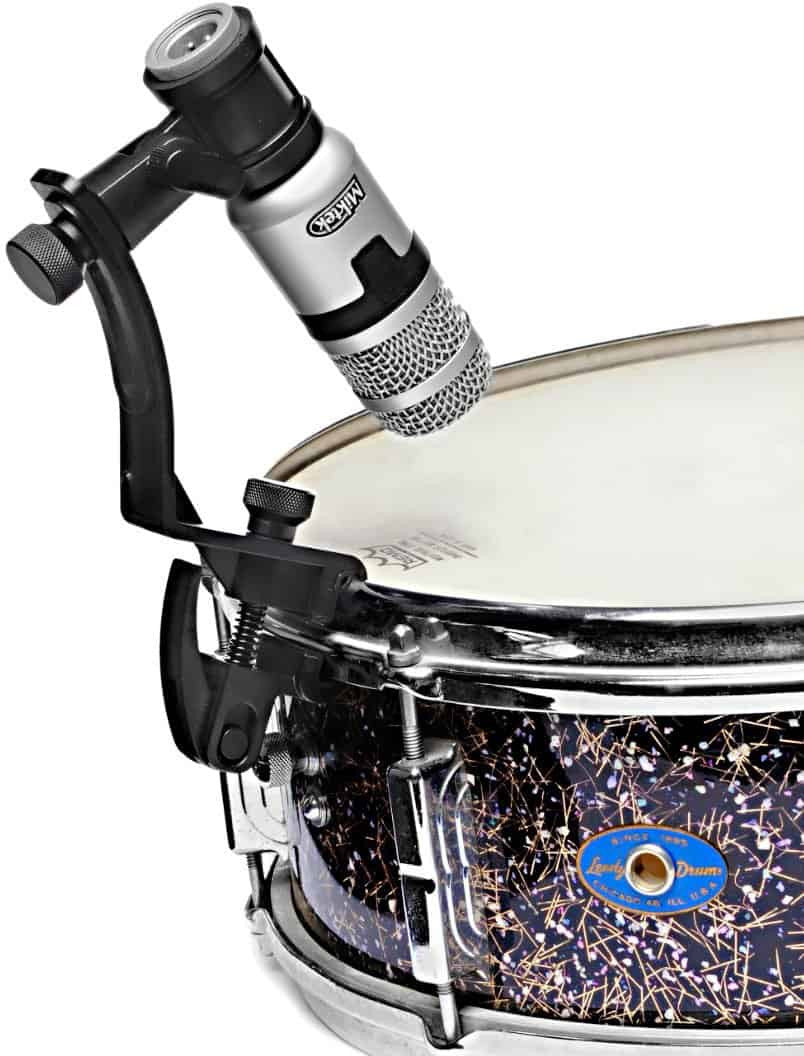
Start with the microphone approximately 3–5 cm above the batter head, positioned just inside or above the rim and angled towards the centre of the drum.
From there, listen before reaching for EQ.
Small movements change the sound:
- Aim more towards the centre for more stick attack and definition.
- Aim more towards the edge for more ring and overtone content.
- Move closer for a tighter, more isolated close-mic sound.
- Move further away for a more natural picture of the complete drum, but also more spill.
- Rotate the microphone to find the best rejection of the hi-hat.
Those changes often achieve more than immediately applying a large EQ boost or cut.
Miktek T100 – a very practical snare and tom microphone
The Miktek T100 is a dynamic supercardioid microphone designed specifically for snare, toms and percussion.
It uses a custom neodymium capsule coupled to a Miktek transformer and is designed to produce a full, controlled response with clear mids and highs.
It can handle sound-pressure levels up to 150 dB, so normal drum levels are not a problem.
The T100 can be mounted directly to a drum rim, making it particularly practical for live use.
A drum microphone can sound excellent, but if every tom requires another full microphone stand around a crowded drum kit, setup quickly becomes inconvenient.
Key T100 features:
- Dynamic microphone.
- Supercardioid pickup pattern.
- Custom neodymium capsule.
- Custom Miktek transformer.
- Up to 150 dB SPL.
- Designed for snare, toms and percussion.
- Also suitable for guitar amplifiers and brass.
- LRM100 rim mount included.
For us, this is one of the most interesting options in the range when you need several drum microphones without turning the microphone budget into the most expensive part of the drum kit.


Miktek PM10 – the premium Nashville-assembled alternative
The Miktek PM10 performs the same general job as the T100: snare, toms and percussion.
But it belongs to Miktek's premium PM Series.
The PM10 uses a custom neodymium capsule and a US-made AMI transformer, and the microphone is assembled and tested in Nashville.
Its frequency response is specified at 50 Hz–16 kHz, with a maximum SPL of 150 dB.
Miktek voiced the PM10 specifically around the requirements of snare and toms, with strong rejection and enough midrange articulation for the drum to retain definition in a full mix.
It also works well on congas, timbales, other percussion, loud guitar amplifiers and brass.
Key PM10 features:
- Dynamic microphone.
- Supercardioid pickup pattern.
- Custom neodymium capsule.
- US-made AMI transformer.
- 50 Hz–16 kHz frequency response.
- 150 dB maximum SPL.
- Assembled and tested in Nashville.
- Rim/microphone clip included.
The PM10 is the choice for users who want the premium Miktek drum-mic platform, while the T100 delivers much of the same family approach at a lower price.


Should you use a microphone under the snare as well?
You can, but you do not have to.
A top snare microphone captures most of the body, attack and overall character of the drum.
A microphone under the snare adds more of the actual snare-wire sound.
This can be useful if the top microphone sounds powerful but the snare lacks brightness or definition in the mix.
There is one important issue: the top and bottom microphones are hearing the drumhead from opposite directions.
Their polarity relationship should therefore always be checked.
Flipping polarity on the bottom microphone often improves the combined sound, but do not do it automatically just because somebody says you should.
Listen to both settings and use the one that produces the stronger, more natural result.
Miking rack toms
Toms are usually easier to mic than snare because there is more physical room around them.
But the same basic principles apply.
A good starting position is roughly 3–7 cm above the drumhead, angled towards the centre.
Then move the microphone while listening:
- Towards the centre generally increases attack and definition.
- Towards the edge emphasises more overtones and ring.
- Very close placement gives more isolation and proximity.
- Backing the microphone away usually sounds more open and natural.
For most rack toms, either T100 or PM10 is a natural choice.
Do not automatically gate all the life out of a tom
Modern digital mixers make gating extremely easy.
That does not mean every tom should immediately be heavily gated.
A gate can be useful live for controlling cymbal spill and cleaning up a dense mix.
But if the release is too fast, the natural decay of the drum disappears.
Before reaching for the gate, first improve the microphone angle and placement.
A well-positioned supercardioid microphone can reduce a surprising amount of unwanted spill before any processing is applied.
Miking a floor tom
A floor tom can be treated in much the same way as a rack tom, and T100 or PM10 may be exactly what you need.
But larger floor toms can produce substantial low-frequency energy.
If the goal is a particularly deep, weighty floor-tom sound, a kick-oriented microphone such as T200 or PM11 can also be very interesting.
There is no rule saying a kick microphone can only be used on kick.
The correct microphone is the one that captures the sound you want.
Miking a kick drum
Kick drum placement can change the sound dramatically because different positions inside and outside the shell emphasise completely different parts of the instrument.
You should first decide what the mix needs.
Do you want:
- More beater attack?
- More low-frequency body?
- A tight modern kick?
- A larger natural acoustic kick?
- Something that cuts through a dense live mix?
There is no one position that provides all of those things equally.
Inside the kick, close to the beater
Moving the microphone deeper into the drum and closer to the beater gives more attack and definition.
This is often useful for rock, metal and other dense arrangements where the kick needs to remain audible through guitars and bass.
But too close can make the sound overly clicky or reduce the sense of size.
Inside the shell, but further from the beater
Moving the microphone away from the beater usually gives a better balance between attack and low-frequency body.
This is often a very good starting point for general live work.
Near the port in the resonant head
If the kick has a port, positioning the microphone around or just inside the opening can produce a useful combination of punch and low-frequency weight.
It is also practical because the microphone can be repositioned without crawling too far inside the drum.
Outside the resonant head
An external microphone generally captures more of the complete drum and more low-frequency resonance.
This can sound excellent in the studio.
It also introduces more spill from the rest of the kit, which may be less desirable on a loud stage.
If you need more attack, move towards the beater. If you need more body, move away from it. Microphone position is your first equaliser.
Miktek T200 – affordable kick and low-frequency microphone
The Miktek T200 is the low-frequency partner to the T100.
It is designed for kick drum, low toms, acoustic bass and bass amplifiers.
Like the T100, it uses a custom neodymium capsule, a supercardioid pickup pattern and a custom Miktek transformer.
The T200 is capable of handling extremely high sound-pressure levels – up to 170 dB – which makes it comfortable in front of very loud sources.
Its voicing is designed to retain low-frequency weight while still providing enough articulation for the source to remain defined.
Key T200 features:
- Dynamic microphone.
- Supercardioid pickup pattern.
- Custom neodymium capsule.
- Custom Miktek transformer.
- Up to 170 dB SPL.
- Designed for kick drum and low toms.
- Also suitable for acoustic bass and bass amplifiers.
At its current price, this is a particularly interesting microphone for anyone building a multi-mic drum setup without compromising the kick microphone.


Miktek PM11 – the premium kick microphone
The Miktek PM11 is the premium counterpart to the T200.
It uses a custom neodymium capsule, supercardioid pickup pattern and a US-made AMI transformer.
Like the PM10, it is assembled and tested in Nashville.
The microphone is voiced for kick drum and other low-frequency sources, with a full response designed to retain both weight and definition.
It is also suitable for low toms, acoustic bass and bass amplifiers.
Key PM11 features:
- Dynamic microphone.
- Supercardioid pickup pattern.
- Custom neodymium capsule.
- US-made AMI transformer.
- Designed for kick and low-frequency instruments.
- High-SPL capability.
- Assembled and tested in Nashville.
If the PM10 is Miktek's premium close microphone for snare and toms, the PM11 provides the same philosophy for kick and other low-frequency sources.


An unexpected use: T200 and PM11 for podcast and broadcast voice
T200 and PM11 were designed primarily for kick drum and other low-frequency sources, but over the years we found another application where both microphones could work surprisingly well: podcast and broadcast-style voice.
We had a number of customers in Norway who specifically bought T200 and PM11 for spoken-word use.
The reason is quite simple.
Both microphones have a full low-frequency character, strong rejection and a dynamic design that works well when used close to the mouth.
For the right voice, this can produce a warm, solid and authoritative sound with less room pickup than many condenser microphones.
This crossover between instrument microphones and broadcast-style vocal microphones is not unusual.
The Shure SM7B comes from Shure's studio and broadcast microphone lineage, but it is also widely used on kick drum, bass amplifiers and other instruments.
TELEFUNKEN's M82 is another particularly relevant example because it was designed for both kick drum and broadcast vocal applications.
The same basic principle can make T200 and PM11 surprisingly effective on speech: a dynamic capsule, strong rejection, close-mic use and a naturally full low-frequency presentation.
They are not marketed primarily as podcast microphones, but we have had many customers use them successfully for speech and podcasting – especially when they wanted a full, warm and controlled dynamic-microphone sound.
T200 and PM11 can therefore also be interesting for:
- Podcasting.
- Voice-over.
- Streaming.
- Radio-style speech.
- Spoken-word recording in untreated or partially treated rooms.
As with any close dynamic microphone, the result depends heavily on the voice, microphone distance and the amount of clean gain available from the microphone preamp or audio interface.
Moving closer increases proximity effect and gives more low-frequency weight, while backing away produces a more open and natural presentation.
For some voices, especially deeper male voices, that can make T200 or PM11 a very interesting alternative to a conventional broadcast microphone.
Miktek PMD7 – the complete premium drum microphone system
The PM10 and PM11 were also combined into one of Miktek's most complete professional drum microphone packages: the PMD7.
This is a product we know particularly well.
We sold a remarkable number of PMD7 systems in Norway through Procom Music AS.
That did not surprise us.
The concept was extremely well thought out because it combined the close microphones from Miktek's premium PM Series with a matched pair of small-diaphragm condenser microphones for overhead duties.
The Miktek PMD7 includes:
- 4 × Miktek PM10 microphones for snare and toms.
- 1 × Miktek PM11 microphone for kick drum.
- 2 × matched Miktek C5 small-diaphragm condenser microphones for overheads.
- Microphone holders.
- Custom aluminium carrying case.
The two C5 microphones are an important part of the system.
Close microphones provide control, attack and weight from the individual drums, while the overhead pair captures the cymbals, stereo image and much of the natural sound of the complete drum kit.
The matched C5 pair uses 0.5-inch gold-coated cardioid capsules, AMI transformers and carefully selected electronics.
Each C5 is individually measured, making the matched pair particularly suitable for stereo overhead applications.
It was not simply a box containing seven unrelated microphones. PM10, PM11 and the matched C5 pair covered the complete drum kit as one coherent premium system.
For live engineers, studios and serious drummers who wanted one complete microphone package, the PMD7 was an easy system to understand and use.
We sold a large number of them in Norway, which gave us extensive practical experience with the complete PM Series drum-mic concept – not only the individual PM10 and PM11 microphones.
At the time of writing, we have one complete PMD7 system remaining.

T100 vs PM10 – what is the difference?
Both microphones are intended for essentially the same family of applications.
Both are dynamic.
Both use a supercardioid pattern.
Both are designed around snare, toms and percussion.
The difference is primarily where they sit within Miktek's product philosophy and production structure.
The PM10 is the premium Nashville-assembled model with an AMI transformer and the more expensive production approach.
The T100 was designed as the more affordable alternative, produced in Asia while retaining Miktek's custom capsule and transformer concept.
From our experience selling and working with both ranges, the T100 retains much of the same Miktek family character.
That does not mean it is simply a cheaper PM10 with a different finish.
It is a different microphone designed to reach a different price point.
T200 vs PM11 – the same decision for kick
The relationship between T200 and PM11 is similar.
Both are intended for kick, low toms and other bass-heavy sources.
The PM11 belongs to the premium Nashville-assembled PM family, while T200 brings the same general Miktek design thinking into a more affordable microphone.
For many live systems, project studios, rehearsal facilities and home studios, the T200 is an extremely practical choice.
For users building a higher-end drum-mic collection and wanting the premium Miktek platform, PM11 is the natural step up.
Both also have that additional spoken-word capability that makes them more versatile than their original kick-drum positioning might suggest.
Miktek T Series vs PM Series
| Feature | T100 | PM10 | T200 | PM11 |
|---|---|---|---|---|
| Main application | Snare / tom / percussion | Snare / tom / percussion | Kick / low tom / bass | Kick / low tom / bass |
| Additional use | Guitar amp / brass | Guitar amp / brass | Podcast / voice / bass | Podcast / voice / bass |
| Type | Dynamic | Dynamic | Dynamic | Dynamic |
| Polar pattern | Supercardioid | Supercardioid | Supercardioid | Supercardioid |
| Capsule | Custom neodymium | Custom neodymium | Custom neodymium | Custom neodymium |
| Transformer | Custom Miktek | US-made AMI | Custom Miktek | US-made AMI |
| Production | Asia | Assembled & tested in Nashville | Asia | Assembled & tested in Nashville |
| Maximum SPL | 150 dB | 150 dB | 170 dB | High-SPL design |
| Current ScaleNordic price | €79.99 | €129.99 | €89.99 | €169.99 |
Four practical starting positions
These are not rules. They are simply useful places to begin.
| Drum | Starting position | Microphone | Move for more attack | Move for more body |
|---|---|---|---|---|
| Snare | 3–5 cm above head, angled towards centre | T100 / PM10 | Aim more towards centre | Back off slightly / adjust angle |
| Rack tom | 3–7 cm above head, angled towards centre | T100 / PM10 | Move towards centre | Back off slightly |
| Floor tom | 4–8 cm above head | T100 / PM10 or T200 / PM11 | Aim more towards impact area | Try T200 / PM11 or back off |
| Kick | Inside shell or around resonant-head port | T200 / PM11 | Move towards beater | Move away from beater / towards resonant head |
Live sound and studio recording are not exactly the same job
The same microphone can work extremely well in both environments, but the priorities can be different.
Live
On stage, isolation matters.
The microphone is competing with cymbals, monitors, amplifiers and a PA system.
Close placement and careful use of the supercardioid rejection pattern can help achieve more level before feedback and reduce unwanted spill.
Consistency also matters.
A rim-mounted tom microphone that remains in the same position throughout a show is often more useful than a theoretically perfect microphone on a stand that gets knocked out of position.
Studio
In the studio you often have more freedom.
You can back a microphone away from the drum to hear more of the complete shell and resonance.
You can also allow more bleed when it contributes positively to the overall kit sound.
Sometimes the best studio drum sound is not the most isolated one.
Bad-sounding bleed is a problem. Good-sounding bleed can help multiple close microphones combine into one coherent drum kit.
Do not forget the overheads
Close microphones provide control, but overhead microphones often provide the overall picture of the kit.
Especially in recording, the close microphones should support the overhead sound rather than automatically replacing it.
This is one reason the PMD7 system makes so much sense.
The four PM10 microphones and PM11 provide close control, while the matched pair of C5 condensers captures the cymbals, stereo image and natural relationship between the different drums.
A useful approach is to build the drum mix from the overheads first, then add kick, snare and tom microphones until the required weight and definition appear.
This often results in a more natural drum sound than starting with every close microphone at full level.
Phase matters more than many people realise
Every microphone on a drum kit hears the same sources at slightly different times.
That means the microphones interact with one another.
When two signals reinforce each other, the drum becomes fuller.
When they partially cancel, the sound may become thin or hollow.
This is especially important with:
- Kick inside and kick outside microphones.
- Snare top and snare bottom microphones.
- Close drum microphones combined with overheads.
- Multiple room microphones.
Always listen to the complete drum sound in mono as part of your setup process.
If adding a microphone makes the drum suddenly lose low end, do not immediately reach for EQ.
Try moving the microphone.
Changing distance by a few centimetres can significantly change the phase relationship.
Polarity and phase are related, but they are not the same thing
The polarity switch on a mixer or preamp flips the electrical polarity of the signal.
It does not move the microphone in time.
It can solve some relationships, particularly snare top/bottom situations, but it cannot correct every phase problem created by different microphone distances.
Sometimes moving the microphone is the better solution.
Gain staging: leave some headroom
Drums have very fast transients.
A preamp level that looks fine while the drummer is playing gently may clip when the player performs at full show level.
Set input gain while the drummer is actually playing as hard as they expect to play.
Leave headroom.
There is no benefit in recording a digital drum signal right below clipping if the next rimshot pushes the preamp or converter into overload.
EQ should refine the sound, not create it from nothing
If the microphone already captures the right balance of attack and body, EQ becomes much easier.
If the microphone is in the wrong position, aggressive EQ often creates new problems while trying to solve the original one.
For example:
- If snare has too much hi-hat spill, change the microphone angle before cutting large amounts of high frequency.
- If kick lacks attack, move towards the beater before adding a huge upper-mid boost.
- If kick lacks weight, move away from the beater before adding excessive low-frequency EQ.
- If a tom rings unpleasantly, check tuning and microphone position before using a narrow EQ cut.
Compression is not a substitute for a drummer
Compression can make drums more consistent, add punch and control peaks.
But heavy compression will also increase cymbal spill and room noise in the close microphones.
The better the drummer controls dynamics naturally, the less the engineer needs to force everything into place electronically.
If we were building an affordable Miktek drum setup
For a cost-conscious system, we would start with:
- One T200 on kick.
- One T100 on snare.
- One T100 for each rack or floor tom.
Then add one or two suitable condenser microphones as overheads.
This creates a very capable drum-mic system without spending premium-microphone money on every close microphone.
If we were building the premium Miktek version
The equivalent premium system would use:
- PM11 on kick.
- PM10 on snare.
- PM10 on each tom.
- A matched pair of C5 microphones as overheads.
That is essentially the philosophy behind the complete Miktek PMD7 system.
Which series would we choose?
That depends on the application and budget.
If you are outfitting several drum kits, a venue, rehearsal rooms or need multiple close microphones, the T Series makes enormous sense.
T100 and T200 are not generic low-cost drum microphones with a Miktek logo added afterwards.
They use Miktek's own capsule and transformer approach and, in our experience, retain much of the family character that made the PM Series attractive.
If you want Miktek's premium drum microphones, US-made AMI transformers and Nashville assembly and testing, then PM10 and PM11 are the natural choices.
If you want the complete premium system, including matched C5 overheads, the PMD7 remains one of the most complete Miktek drum packages.
The PM Series is the premium option. The T Series is the value option. Both make sense – just for different budgets and applications.
These microphones are useful for more than drums
T100 and PM10 can also be used on:
- Guitar amplifiers.
- Brass instruments.
- Conga.
- Timbale.
- Hand percussion.
T200 and PM11 can also be used on:
- Bass amplifiers.
- Acoustic bass.
- Large floor toms.
- Podcast and broadcast voice.
- Voice-over.
- Other high-SPL low-frequency instruments.
That makes them more useful investments than microphones that only ever leave the case when somebody records a drum kit.
Frequently asked questions
What is the best microphone position for snare drum?
A useful starting point is around 3–5 cm above the batter head, positioned near the rim and angled towards the centre. From there, change the angle and distance while listening. Moving towards the centre generally increases attack, while moving towards the edge increases ring and overtone content.
Should I use T100 or PM10 on snare?
Both are designed for snare and toms. T100 is the more affordable option, while PM10 is the premium model with a US-made AMI transformer and Nashville assembly and testing.
Can T100 be used on toms?
Yes. T100 was designed specifically for snare, toms and percussion and includes a rim-mount solution for practical drum-kit placement.
Should I use T200 or PM11 on kick drum?
Both are designed for kick and low-frequency sources. T200 is the more affordable T-Series model, while PM11 belongs to Miktek's premium PM range.
Can T200 and PM11 be used for podcasting?
Yes. Although primarily designed for kick drum and low-frequency sources, both can work very well on spoken voice. We have had many customers use T200 and PM11 for podcast and broadcast-style applications, especially where a warm, full dynamic-microphone character was wanted.
Can T200 be used on a bass amplifier?
Yes. T200 is designed for kick, low toms, acoustic bass and bass amplifiers.
Can PM11 be used on floor tom?
Yes. PM11 is particularly suitable for low toms where a deeper low-frequency response is desired.
What microphones are included in the Miktek PMD7?
The PMD7 includes four PM10 microphones, one PM11 and a matched pair of C5 small-diaphragm condenser microphones, together with mounting hardware and a custom aluminium case.
What are the C5 microphones used for in the PMD7?
The matched C5 pair is primarily intended for overhead use, capturing cymbals, stereo image and the overall sound of the drum kit.
Do T100, T200, PM10 or PM11 need phantom power?
No. They are dynamic microphones and do not require phantom power. The C5 overhead microphones in the PMD7 are condenser microphones and do require phantom power.
Is supercardioid always better than cardioid for drums?
No. It is simply a different pickup pattern. Supercardioid provides tighter side rejection, which can be extremely useful around a drum kit, but it also has a small rear pickup lobe. Correct microphone orientation remains important.
Do I need a microphone under the snare?
No. Many excellent drum sounds use only a top snare microphone. A bottom microphone is useful when you want additional snare-wire definition.
Should I gate tom microphones?
Only if the mix requires it. Good placement and microphone rejection should come first. If a gate is used, set the release carefully so the natural decay of the tom is not cut off.
Are the Miktek T Series microphones made in Nashville?
No. The T Series is produced in Asia as Miktek's more affordable drum-microphone line. The premium PM10 and PM11 use US-made AMI transformers and are assembled and tested in Nashville.
Why does microphone placement matter so much?
Different areas of a drum produce different combinations of attack, resonance and low-frequency energy. Moving a microphone changes which parts of the instrument are emphasised before the signal ever reaches the mixer.
Our final advice
If there is one thing we have learned from decades of live sound, recording and selling microphones, it is that the most expensive microphone is not automatically the right microphone in the wrong position.
Start with the instrument.
Tune it.
Listen to it acoustically.
Choose a microphone appropriate for the job.
Then move the microphone until the sound starts to work before reaching for EQ.
That principle applies whether you are using a €79.99 T100 or a much more expensive studio microphone.
Our long relationship with Miktek is one reason we are comfortable recommending these microphones.
We started working with the brand through Procom Music AS in Norway, long before ScaleNordic existed in its present form.
We saw the CV4 become a genuine success, selling close to 300 units in Norway alone.
We also sold a remarkable number of Miktek's complete PM drum microphone systems.
That gave us experience not only with individual microphones, but with the way Miktek's different microphones worked together around a complete drum kit.
We also saw customers discover uses beyond the original product descriptions – including T200 and PM11 as surprisingly effective podcast and spoken-word microphones.
We learned what musicians and engineers liked about the Miktek approach: clarity without unnecessary harshness, practical professional construction and a recognisable family character across very different microphone designs.
The T100, T200, PM10 and PM11 are very different microphones from the CV4 tube condenser that first made such an impression on us.
But we can still hear and see the same basic philosophy behind them.
If you want Miktek's premium drum-mic platform, look at PM10 and PM11.
If you want the complete premium system with matched overheads, look at the PMD7.
In every case, spend more time moving the microphone than moving the EQ.